Saturday, September 28, 2013

Pattern Party Part 2!

So, if any of you have been following my blog right from day 1, you might remember that my VERY FIRST blog post on Fun With Firsties was all about our Pattern Party!
Well, it was such a hit that I brought back the pattern party for it's second year!

We got the party rolling by making edible pattern bracelets with Fruit Loops and Twizzlers. And there was definitely more eating than patterning going on...I may have been guilty of this, too.

Then we rotated through 4 different pattern centres in our table groups:

At the first centre, the kiddies got to make their own pattern crowns using stickers and stamps:
(I wish I got a picture at the end of the day; they were all too stinkin' cute in their pattern crowns!)
Cute story: at this centre, while licking and sticking stamps, one little cutie decided to share with us that "my mom doesn't let me lick things at home, which is crazy because I just love licking things!" HA!

At the second centre, they made patterns with play-doh and cookie cutters:

The third centre functioned like a "free choice" centre. The kiddies could choose from a variety of math manipulatives (snap cubes, animals, keys, pattern blocks, and beads) to sort or build patterns:

And finally, at the fourth centre, they got to make pattern strips using popcorn kernels and dried split peas (a lovely fall colour combo, I might add!)

In addition to our pattern party during our end-of-day math block, the kiddies also came dressed in patterns (as you may have noticed in some of the pics above!) and had the opportunity to bring in a small patterned object to share with the class. And with that, pattern party part 2 was another huge success! We wore patterns, shared patterns, made patterns, and ate a whole lot of patterns. Sugar 'em up, and send 'em home! ...you're welcome moms and dads ;)

On another note, I am super excited to whip out some of the literacy centre activities from my new Everything Autumn pack next week. In the upcoming weeks we will have a fall week (this week), Thanksgiving week, pumpkin week, spider week, and Halloween week...and all of the resources I will need are now featured in this one HUGE pack!

Woohoo! *150* pages of hands-on literacy centre activities! 
...on the flip side, it looks like I'll be laminating and cutting all weekend...

Here's a small peek at what's included:
Happy fall ya'll!!! Have a great weekend :)

Friday, September 20, 2013

Literacy Centres & A Rainbow of Fun!

Hey'all...It's Fridayyyy!
I had a great week with my new bunch of crazy kidlets and hope your week went well, too!

Today was one of my favourite themes that I typically do at the beginning of the school year: colours!

We began each day by reading this poem:
Each morning we focused on something different (identifying capital/lowercase letters, finding specific words, etc.). This poem will also be the first page of our very first big book, which we are in the process of "publishing" to hang in the reading centre (the kiddies will be able to read and review what we have learned throughout previous weeks by reading our chart paper big books). On another piece of chart paper, we also took turns filling out the phrase "_name_ likes _colour_" (e.g. Sally likes green) to be featured in our big book...and I forgot to take a picture of those pages, sorry! 

Here were our centre activities for the week:

Word Work 1
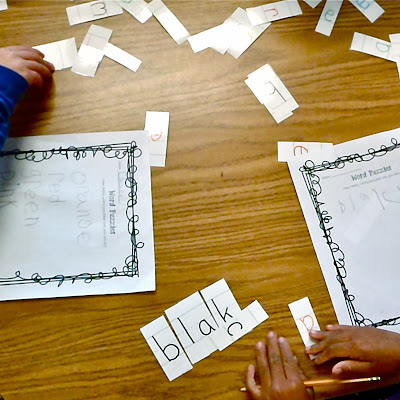
At Word Work 1, students had to take all of the coloured letters (written on sentence strips, laminated, and cut) out of the paper bag, sort them by colour, and then unscramble the letters to spell a mystery colour word. They could look at our word wall or Colour Poem to help them spell the word correctly.
Click the pic below to download your FREE copy of the worksheet!

Word Work 2
At Word Work 2, the kiddies had to use the word wall or refer to our Colour Poem to stamp the colour word, write the word, and colour the crayon the corresponding colour. I helped my little kidlets out by writing the first letter of each colour word. 
If they happened to finish this activity before Friday, they could complete the colour word puzzles (featured in the first picture)
Both activities are from Cara's Ready, Set, Learn pack.

Writing Centre
This week at the Writing Centre this week, the kiddies focused on writing lists. Once they are independent enough, my writing centre will function similar to a "free choice" centre; the kids will be able to pick any writing activity they want to complete that week (make a list, write a card/postcard, write a letter, write a story, write in our Shared Writing Journals, or free write in their writing notebooks). Until then, we will gradually be practicing ONE of the 6 Writing Centre options each week to help the kiddies become familiar with each option. 
So this week, they picked any colour they wanted and listed all of the things they could think of that are that colour (e.g. if they chose green, they could list things such as leaves, grapes, grass, apples, clothes, guacamole, etc.). And, of course, getting to write lists on the coloured notepads is just the bees knees to a first grader.

Pocket Chart
At the Pocket Chart, my little lovelies sorted pictures by colour. There are 3 pictures for each colour. After sorting the pictures, they challenged themselves by labelling each picture with its corresponding word. Each colour group featured rhyming words to help the kiddies decode each word (e.g. for the red colour group, there are pictures of a red coat, a red boat, and a red goat).

Click the pic below to download your FREE copy of the pictures!
(I made this activity a couple years ago and can't find the file that features the corresponding words. Sorry!)

Listening Centre
Of course for a week filled with colour words, there's no better book than Eric Carle's Brown Bear, Brown Bear to read along with at the Listening Centre!

Write the Room
At Write the Room, kids searched around the room for 11 different images of crayons and completed the corresponding worksheet from Cara's Write On! pack (apparently I'm crazy for Cara this week!) 

So that about sums up our week's literacy centre activities!
________________________________________

Next up, I've had a couple questions about how I run my literacy centres. Here's how!

I made this *life-saving* SmartBoard file to help us rotate through our centres:
Click the pic below to download an *editable* file (directions included)!
To rotate through centres, my Teacher's Assistant (which is one of my classroom jobs...more on that in a future post!) moves the black bar down to the next activity each time I ring the bell. I typically ring the bell every 10 minutes or so. This works out really well for me because, during this time, I am pulling groups for guided reading. This way, one of my kiddies changes rotates the centre board for me, the kiddies automatically clean up and quietly move on to their next centre *without me having to draw my attention away from my reading group once.* Love it.

So anyways, each picture corresponds with one of our 7 centres. To help my little darlings remember where each centre is located around our room, I have picture and word labels at each centre:
(Sorry about the horrible image quality, I need to stop taking pictures with my phone!!!)
So above you can see the little label stuck above my Word Work 2 centre (the number beside the label is for my Math Tubs)

Here's another example of the label at my Listening Centre (notice the black arrow):

Because the kiddies are walking around the room for my Write the Room centre, this label is just on a basket on the back counter where kiddies can grab their clipboard, worksheet, and pencil:

If you would like to download the labels for FREE, click the image below!

Well that's all for now... It's time to wind down and have dinner...

Sunday, September 15, 2013

Sight Word Wands

Hey'all! If you follow me on Instagram (@funwithfirsties), then you may have seen this pic I posted a couple weeks ago:
These are sight word wands
There are so many different ways to use these magical little sticks, but right now, I use about 5 different wands a week as reinforcement when introducing a new set of sight words. 

I usually introduce between 2 and 5 new sight words at the beginning of each week. I pick words based on how I can use them in a catchy phrase to help kiddies remember. For example, this week I am introducing the words "the," "little," "can," and "jump," and will introduce them using the phrase, "the little frog can jump." We will add these words to our word wall, sight word celebration board (stay tuned! I'll be blogging about this later in the week!), and I also have the words displayed on our magnetic whiteboard with alphamagnets all week (throughout the day, I mix up the letters in one of the words and the kiddies get to put them back in order for a little extra practice...they LOVE this!).

ANYWAYS, the wands featuring our sight words of the week are left in the reading center/library (along with any sight word wands from previous weeks). The kiddies can choose a wand and see if they come across that word in their book as they read. Whenever they find a word, they get super excited and show all of their friends in the library...you'd honestly think they had found a pack of Skittles hidden in the book. It's honestly as simple as that!

I have three sets of sight word wands ready to go (pre-primer, primer, AND first grade) since the majority of my little learners this year are coming in at a beginning SK level.

Okay, so here's how I made them!

First I printed off the stars:
Click any of the following options for your FREE copy: Pre-Primer -- Primer -- First

Next, I folded each page in half and cut each star out so when I opened up a star, it was still attached at the folded point (this way the stars are double-sided and will leave a "pocket" in between the front and back...this will make sense shortly!)

I laminated each star and cut a little groove at the bottom (yes, this was totally tedious, but my theory is: once you've done it once, you never have to do it again!). 

The point of cutting out a groove is to break through the laminating which was "gluing" the front and back papers together, leaving a space in the middle to slide a popsicle stick in:
(this photo is taken looking at the bottom of the star, down into the cut groove)

For most stars, I could just pinch the two sides of the star together and the pocket would pop open. But some stars were being finicky so for those I just used tweezers to get between the two sides and slide my popsicle stick in. I used a hot glue gun to put a bit of glue on the end of the popsicle stick and then slide it in to the star. 

Did any of that make sense???!?! 
I feel like it sounds so complicated but it was really super easy...just somewhat time consuming. 

That's it for now, have a great week everyone!

Monday, September 02, 2013

September CURRENTLY

I'm super excited to be linking up with Farley for her infamous Currently...September issue!
Here's mine:

Listening- I don't know why but I *have* to run the dishwasher at night...running it in the morning is just throwing me right off!

Loving- HUGE shout out to Kassie for her brilliant design!!! Some of you may have noticed that I already had a makeover about a month ago, and although I liked it, it just wasn't me. So this time, I followed my instincts and went with bright, bold, and colorful....that's more like it! Kassie was *so* fabulous to work with; I started off not having a clue of what I wanted but grew more and more particular as we went along. Kassie was super patient and so quick to constantly send me visual updates of what was going on with my little blog. It made the process so smooth, and I cannot believe how fast she got it all done (despite working on several other blogs at the same time!). Thanks, Kassie!!!
Photobucket

Thinking- I've just begun reading The Happiness Project and am inspired by her first challenge (I won't say much more in case some of you want to read it!). Since then, I've been dying to clean out one black-hole of a closet and my "craft room" (that is currently more full of things that just don't have a place rather than craft supplies). I'm not done it yet, but I already recommend you read this:

Wanting- I just woke up and every morning I have my ginormous mug of green tea...I went straight to my blog today so I'm craving my daily dose!

Needing- almost every morning now I wake up with lower back pain. Stupid mattress.

My three goals for September:
1. Fall is my absolute *favourite* season. I love watching the leaves change, getting to whip out my fall wardrobe, the crisp air, the smell of my pumpkin candles....so my goal is to go for a walk EVERY day. It doesn't have to be a long walk, but it will be enough to "make my heart happy," as Farley says ...Plus my puppy will thank me, too!
2. I'm always grumpy when I get home, have to make dinner, but don't know what to make. This month, I'm going to make my life easier and plan (and prep, if possible) our week's meals ahead of time. Just thinking about it makes me happy.
3. Getting back into school routine always stresses me right out. There are so many unanswered questions and it takes next to noting to overwhelm me and make me panic. In September, I'm not going to sweat the small stuff and not think 5 days ahead. one.day.at.a.time. And if that doesn't work: red wine and a bubble bath should do the trick! 

Okay, your turn! Head on over to Oh'Boy 4th Grade to share your Currently!
Related Posts Plugin for WordPress, Blogger...